Showing posts with label handmade. Show all posts

Tuesday, September 29, 2015

Sale!! Check out my Facebook page!

Hello Everyone!

It's been a long time hasn't it! I have finally decided to stop selling on Etsy for now and am selling off my remaining stock. Almost all of my craft supplies have sold but I still have some lovely hair accessories, jewellery and a couple of sets of push pins/thumb tacks left.

I opened a Facebook page to sell my remaining stock. It is called Stitches and Love. All items have been discounted so there are some great bargains there! You can buy simply by commenting on photos of the items you want. Payment will be by direct deposit and I can post anywhere at the buyers expense.

Here are some photos of some of my items. You can buy and see more at my Facebook page.

This cute navy polka dot headband is my only headband that has custom spots available. You can get this made in any size you choose from newborn to adult. There are 8 spots available.


Cute mini puffs! In 0-1yr and toddler size.


Mini puffs and polka dots. In 0-1yr and toddler sizes.


Large tulle flower in older child/tween/teen size.


Classy mini tulle combo. In 0-1yr and toddler sizes.


Fold over elastic hair ties!! Printed, plain and tie-dye fold over elastic.


Glitter elastic hair ties.


Sweet hair combs.


Super cute push pins or thumb tacks.


I have a few different types of earrings.


For more details on anything, head on over to my Facebook page and have a look! Thanks!

Friday, March 29, 2013

Fabric Easter Eggs Tutorial from Retro Mama

This gorgeous little Easter egg tutorial has been around for awhile now but I seem to forget about it every year until it is too late! I thought I would share it in the hope that I will remember about it for next year and hopefully you will remember too! You can find it here on Retro Mama's blog.


If you haven't discovered Retro Mama, go and check her out right now! She has some beautiful sewing patterns and uses such gorgeous fabrics. I love browsing through her blog and etsy store.

This tutorial is pretty quick and easy to whip up and is fantastic for using up your fabric scraps. I won't get to make any this year because I am currently sick and still have to make my boy's Easter chocolates (they are dairy and additive free) but these are so easy you might still have time!

Happy Easter to all of my lovely readers!

Thursday, March 28, 2013

Handmade Tea Towels Tutorial

One of my favourite websites is Spoonflower...a site that allows you to upload your own designs and get them printed on fabric, wallpaper, wall decals and over Christmas, they also had wrapping paper available too!


I discovered Spoonflower about a year and a half ago and had visions of all the wonderful things I would make and fabrics I would design but alas, things have not gone to plan with another little person in the family and I am only now just starting to look at designing some fabric. Even still, who knows when I will actually get it done!

In the meantime, there are countless beautiful designs already uploaded to Spoonflower that you can purchase and when they had a 2013 tea towel competition late last year, and then had a buy 1 fat 1/4 get 1 free sale, I made the most of the situation and ordered some tea towels to make up for Christmas presents. Below is the design I ordered. You can find it on Spoonflower here. This project would actually be great for any time of the year, not just Christmas!


These are pretty easy to make up and great for a beginner as it is all straight sewing! Here's my finished tea towels.


I thought I would add a few instructions on how to sew them up just in case anyone isn't quite sure what to do. It is really simple but wasn't quite as quick as I hoped. I like to have all raw edges hidden and I hate hemming stuff with a passion and that is all you do in this project. haha! Anyway, I was still really happy with how they turned out and the fabric is lovely. Make sure you get the tea towels printed on linen-cotten canvas. It is perfect for tea towels.

How to Finish Your Tea Towel

1. Order your chosen design from Spoonflower and make sure you have it printed on linen-cotten canvas in a fat quarter size. Just type tea towel in the search bar and you will find designs specifically made for tea towels!

2. Cut out your tea towel. Make sure you leave at least 2cm around the design for the hems. Depending on how the designer has designed the tea towel image, you may have a given rectangle to cut out or you may have to get out your ruler and measure it yourself.

3. Secure edges to prevent fraying if you wish. You can zigzag along the edge, overlock, or use pinking shears to do this. I didn't bother since it was covered up and fully enclosed...and I was in a hurry!

4. Fold over the long edges 1cm (or whatever size you want) and press. Then fold them over again 1cm, press, and pin to keep them in place. I used this awesome template from the Scientific Seamstress and it made the job sooooo much easier!


5. Now fold over the short edges in the same way you did the long edges. To get rid of some bulk in the corners, you can clip them like this. (The pic below shows a clipped corner when I started folding the long edge but it's the same idea for the short edges.)


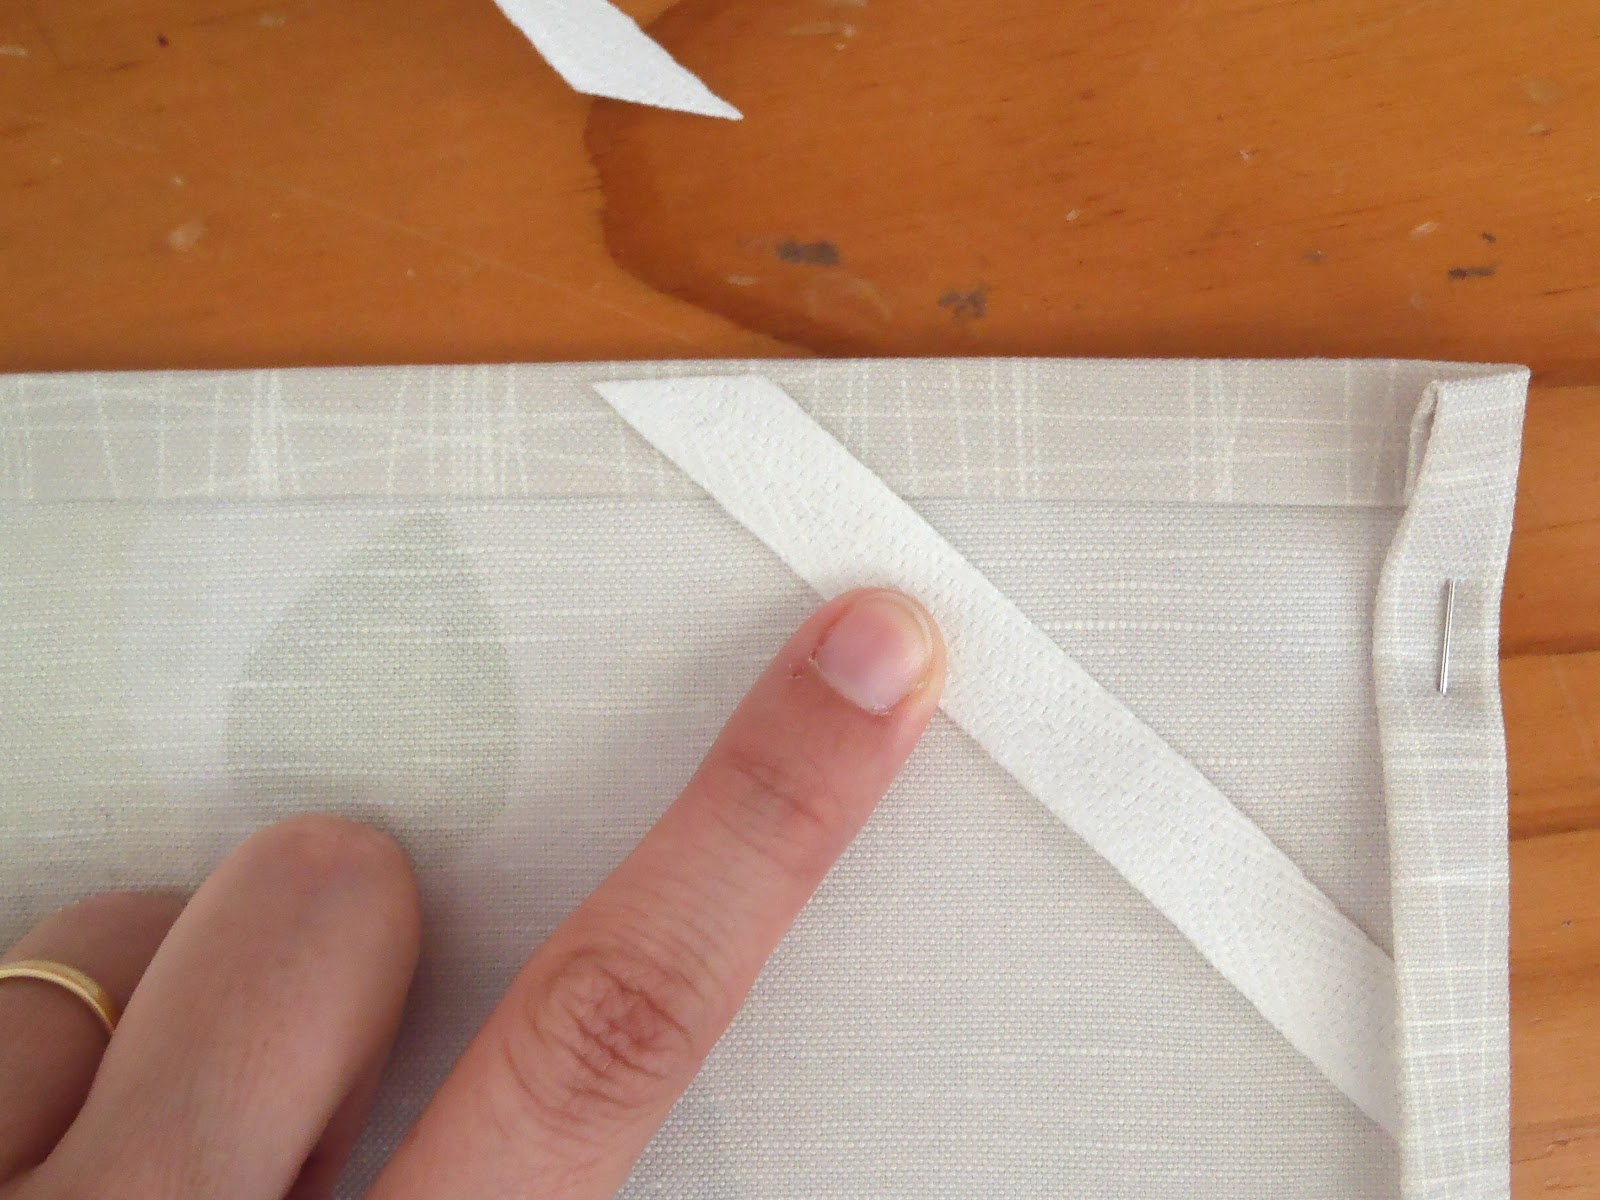
6. If you want, cut out a short section of twill and place this diagonally in one of the corners on the back. This can be used to hang it up if you like.

Sit twill under edges. 

Trim even with edges.

Add a message if you wish.

7. Now sew it up! Sew from the top side as the nicest stitching is always on the top. Start in the middle at the bottom or somewhere else that isn't too noticeable. Now, when I got to the corners, I sewed to the edge, then put the machine in reverse and sewed back about 1cm. I stopped at this point with the needle in the fabric and pivoted the fabric ready to start sewing down the next side. Before sewing down the next side, I put the machine in reverse again and sewed back to the edge, then continued sewing forward down the new edge as normal. This secured the corners well and saved having to completely stop and start stitching at each corner. Hopefully the photos below will make this explanation clearer.

The tag sewn in.

Below you can see how I stitched along to the edge, backtracked to the point where the 2 lines of stitching intersect, then stitched back to the other edge and continued stitching forward down the new side. If this isn't clear to anyone, please let me know and I will post a diagram.

The corners securely stitched. 

If you happen to miss some of the folded over edge like I did below, just stitch along that area making sure it is caught in this time. If you are lucky, it will barely even be noticeable like mine.

The edge I missed catching on the back.

The fixed up edge from the front! You can hardly even notice the extra line of stitching!

And that's it!

In a nutshell...

1. Cut out.
2. Fold long edges over twice, press and pin.
3. Fold short edges over twice, press and pin.
4. Add a hanger if you want on the back.
5. Sew!

Now you have some lovely, personal, and handmade gifts! If you would like to make it even more unique, you could try designing and printing your own fabric. Here is a great tutorial on how to give that a go with old, handwritten recipes. Have fun!

Friday, February 15, 2013

Stitches and Love Store is Open!

Eeeek!! The store is finally open! I would love you to come and take a look


I've started things off with some cute little sets of hair elastics. 


Pretty Chevrons

Dusty Pinks

All packaged up and ready to go!

These elastics are made from fold over elastic (FOE) and glitter elastic. The FOE is super soft and much gentler on hair than standard hair elastics. I have used them for a few months now and love them! The glitter elastic is quite gentle too, just not quite as gentle as the FOE. I absolutely LOVE the glitter elastic. :-)

Please share my shop with anyone who may be interested. I will be adding lots more items as I make them and have lots of plans for more gorgeous hair accessories, toys, baby items, clothing and things for around the home. 

For all of you who love my fabric ball tutorial and pattern, I will be making some of these too!

Thursday, February 14, 2013

A New Year with New Adventures

This year is full of new things for our family. A new house, new hometown, new job, new kindy, new friends, new church, new goals, and lots of other new things.

Something new for me is that I have finally decided to go ahead and start creating some things to sell! That right! I am opening up an Etsy store!! I have thought about this and wanted to try it for such a long time and have finally decided to do something about it. I also need something bringing in money so I can buy more fabric and craft supplies. ;-)

I am also learning how to source craft supplies and fabric in the country. It is proving quite tricky! We moved to Mt Isa in Queensland's north west and sewing supplies up here are scarce! I am getting very good at scouring the internet and the best source of fabric I have found here so far are op shops! I bought this gorgeous vintage flat sheet last week.


Isn't it sweet?? I have lots of ideas running around in my head for this!


I also got this beautiful fabric! 


I'm not sure what I'm going to use this one for but I absolutely love asian prints and fabrics and couldn't pass it up! I am hoping to create lots of asian inspired items for my shop. 

Anyway, as you might have noticed, I love to try lots of different crafts and sewing projects so to start off with, I will be selling quite a variety of items while I discover my style. I am also fitting in my crafting around my 2 little boys and helping out my husband by creating teaching resources so I will only be listing items as I can make them. This might mean that some weeks it will only be 1-2 new items...other weeks it might be 10! Hopefully there won't be any many weeks with none.

I don't have the store open yet as I am doing some final touches but will let you know as soon as it opens! Keep checking back for updates!!

Tuesday, November 6, 2012

Emma's Bears Free Teddy Bear Pattern and Tutorial

One of my good friends, Emma, is the most amazing teddy bear creator. She has been making bears since we were in high school and now she sells them as well as bear making supplies. I received a few bears as Christmas presents way back then.


Emma has just shared a fantastic free bear pattern and tutorial on her blog and I wanted to share it with you. This is the gorgeous bear you can create from her pattern.


Emma's bear supply store is called Fur Addiction and features beautiful furs and other bits and pieces. She dyes her own fur and even paints her own eyes. They are just gorgeous! It's certainly worth a look! She also sells her creations and supplies on Etsy. Almost all of Emma's creations are one of a kind. There are bears and other stuffed animals, patterns, kits and more. If you want to get into bear making, this is a wonderful place to learn.

Thursday, March 15, 2012

Finally My Free Fabric Ball Pattern is Here!

I'm very excited to finally be able to share my fabric ball pattern with you!! It only took me 8 months (eek!!) to get around to putting it into a pdf and posting it online! My wonderful husband helped me to create a pattern piece based off a perfect sphere which has produced lovely, round, fabric balls. Last night, he taught me how to use Illustrator so I have a lovely little pdf pattern to share with you all. I hope you like it!

You can find the free fabric ball pattern posted back in the original tutorial here.


PS: There are also a couple of new tips in the tutorial that I have learnt after sewing a number of these. Have fun!! xx

Tuesday, August 30, 2011

Quick Version of the Free Bunting Tutorial & Pattern

I tend to write quite detailed tutorials based on exactly what I did which is handy and can save confusion and questions but can take awhile to read and work through. I thought I'd post a super quick and easy version of the bunting tutorial for those who don't need all the details because it really is an easy thing to make.


Requirements

- Fabric of your choice (how much depends on how many flags you want to make...it's a great project for using up your scraps!)
- Bias Binding or Ribbon (length depends on how long you want your bunting to be)
- Cotton thread

1. Print the template. Choose the size flag you want and cut it out.


2. Cut out 2 triangles per flag for as many flags as you want.

3. Pair up your triangles and pin each pair with right sides together.


4. Sew down the 2 long sides of each triangle with a 1cm seam allowance.


5. Clip all corners of the triangle making sure you not only clip across the main point of the triangle but up the sides a little too.


6. Turn all triangles out the right way and press.


7. Fold and iron your bias binding or ribbon in half lengthways.


8. Measure 30cm-50cm from one end of your binding and slide the top (unfinished edge) of your first flag in between the fold and pin it in place. Do the same for the next flag leaving a gap between flags that is whatever length you desire. Repeat this with the same gap between all flags until you have them all pinned into the binding.


9. Trim the end of your binding so that it is the same length as the piece you left at the start.

10. Fold each end of the binding in slightly to create a neat finish and pin in place.


11. Sew along the open edge of the length of the binding making sure you catch in both sides of the binding and sewing in all flags. And you're finished!! :-)


Recommendations

- Use fabric that is not see-through. I got caught out with this even using quilting fabric. Thicker fabric won't show through the other side and will hide the seam allowances better giving it a much nicer look.

- Use bias binding or ribbon that is not see-through. Again like the fabric, I found the bias binding I used showed the fabric underneath and it will look a lot nicer if you can't see patterns from the flag fabric showing through.
Related Posts Plugin for WordPress, Blogger...