This year has been a long year. I just wanted to post a little update as to why I haven't been posting these last few months. My husband has been quite sick this year and just isn't healing properly. He's on to his 4th operation tomorrow after a few months off work. He has been at home more than he has been at work this year. :-( This has been going on since the beginning of March.
Consequently, I have had a lot on my plate and other things to focus on so my blog hasn't received much attention at all. I hope to get back to blogging but feel that we have quite a journey ahead of us until he is fully recovered so I am not sure when I will be back.
Thank you for reading and visiting my blog and I hope to be back soon!
Sunday, August 18, 2013
Wednesday, June 12, 2013
Update and New Items in My Etsy Store
Well it's been awhile since I last posted. Things have been pretty crazy here for the last month with Pete having to go back in for more surgery and being bedridden for quite a few weeks. It's meant I have had to take on everything at home which I'm not used to as Pete helps out a lot. I'm so tired!! It was also Max's 5th birthday last weekend and I was busy whipping up a cute little chef costume for him.
Somehow in all of that, I have managed to list a few new items in my etsy store and have sold out of all my pre-made sets of hair ties!! A huge thank you to all of my lovely customers!! Here's a few pics of the new items.
I decided to try selling the hair ties in this format so customers could get exactly the colours they want. It seems to be popular as I have already sold a few. What do you think? When I get lower on my elastic stock, I will look at ordering new colours and try to get some more neutral elastics like a few of my readers mentioned during the competition that was run a little while ago.
Now that Pete is beginning to become more mobile, I will hopefully be able to start doing a bit more crafting again....and posting here too!
Somehow in all of that, I have managed to list a few new items in my etsy store and have sold out of all my pre-made sets of hair ties!! A huge thank you to all of my lovely customers!! Here's a few pics of the new items.
 |
| Sweet Baby Headband |
 |
| Sunflower Earrings |
 |
| Resin Cabochon Bobby Pins |
 |
| Resin Cabochon Rose Bobby Pins |
 |
| Fold Over Elastic Hair Ties - Choose Your Own Colours |
Now that Pete is beginning to become more mobile, I will hopefully be able to start doing a bit more crafting again....and posting here too!
Thursday, May 9, 2013
Getting Back Into Things
Well it's been awhile. I did return from holidays...a month ago actually!! It's just taken that long for me to get back into the swing of things. The boys started day care 2 days a week when we got back so that has been a big adjustment for all of us and despite now having 2 days a week to myself (until I get my teacher registration done and start working), I have spent most of them helping out at Pete's school or catching up on some much needed sleep. I can't believe how much I have slept!!! I must be catching up on the past 5 years of sleep deprivation. Ha!
Anyway, I did buy lots of goodies while I was away. I think I filled about half my new suitcase with fabric! There were also a bit of crafty bits including some needle felting items. When we flew home, it was an effort to balance out all of our stuff so we weren't over the weight limit!

I have started pulling it out and pre-shrinking/washing the stuff I need to use pretty soon but haven't gotten much further than that. I'll take a few pics of some of the really cute stuff for another post. Instead, I've been distracted by Mother's Day and getting some hats made for my boys. I can't post about my Mother's Day gift for my mum yet because she might see it but here's a little teaser.

I also received this exciting bundle of fur from my friend Emma at Fur Addiction.

It was so exciting pulling all this fur out of the box. It was literally stuffed to the limit with all of this furry goodness. I can wait to start using it for some projects I have in mind.
Well that's where I'm up to for now. I'm also waiting on an order from my favourite covered button store, Jackobindi. I have some new hair ties, earrings, cabochons and hair clips coming.
I will be doing my best to get some new items up in my store over the next week. It seems sooooo much easier to make them than to list them on etsy!
Happy crafting!
Friday, March 29, 2013
Fabric Easter Eggs Tutorial from Retro Mama
This gorgeous little Easter egg tutorial has been around for awhile now but I seem to forget about it every year until it is too late! I thought I would share it in the hope that I will remember about it for next year and hopefully you will remember too! You can find it here on Retro Mama's blog.

If you haven't discovered Retro Mama, go and check her out right now! She has some beautiful sewing patterns and uses such gorgeous fabrics. I love browsing through her blog and etsy store.
This tutorial is pretty quick and easy to whip up and is fantastic for using up your fabric scraps. I won't get to make any this year because I am currently sick and still have to make my boy's Easter chocolates (they are dairy and additive free) but these are so easy you might still have time!
Happy Easter to all of my lovely readers!
Thursday, March 28, 2013
Handmade Tea Towels Tutorial
One of my favourite websites is Spoonflower...a site that allows you to upload your own designs and get them printed on fabric, wallpaper, wall decals and over Christmas, they also had wrapping paper available too!

I discovered Spoonflower about a year and a half ago and had visions of all the wonderful things I would make and fabrics I would design but alas, things have not gone to plan with another little person in the family and I am only now just starting to look at designing some fabric. Even still, who knows when I will actually get it done!
In the meantime, there are countless beautiful designs already uploaded to Spoonflower that you can purchase and when they had a 2013 tea towel competition late last year, and then had a buy 1 fat 1/4 get 1 free sale, I made the most of the situation and ordered some tea towels to make up for Christmas presents. Below is the design I ordered. You can find it on Spoonflower here. This project would actually be great for any time of the year, not just Christmas!

These are pretty easy to make up and great for a beginner as it is all straight sewing! Here's my finished tea towels.

I thought I would add a few instructions on how to sew them up just in case anyone isn't quite sure what to do. It is really simple but wasn't quite as quick as I hoped. I like to have all raw edges hidden and I hate hemming stuff with a passion and that is all you do in this project. haha! Anyway, I was still really happy with how they turned out and the fabric is lovely. Make sure you get the tea towels printed on linen-cotten canvas. It is perfect for tea towels.
How to Finish Your Tea Towel
1. Order your chosen design from Spoonflower and make sure you have it printed on linen-cotten canvas in a fat quarter size. Just type tea towel in the search bar and you will find designs specifically made for tea towels!
2. Cut out your tea towel. Make sure you leave at least 2cm around the design for the hems. Depending on how the designer has designed the tea towel image, you may have a given rectangle to cut out or you may have to get out your ruler and measure it yourself.
3. Secure edges to prevent fraying if you wish. You can zigzag along the edge, overlock, or use pinking shears to do this. I didn't bother since it was covered up and fully enclosed...and I was in a hurry!
4. Fold over the long edges 1cm (or whatever size you want) and press. Then fold them over again 1cm, press, and pin to keep them in place. I used this awesome template from the Scientific Seamstress and it made the job sooooo much easier!

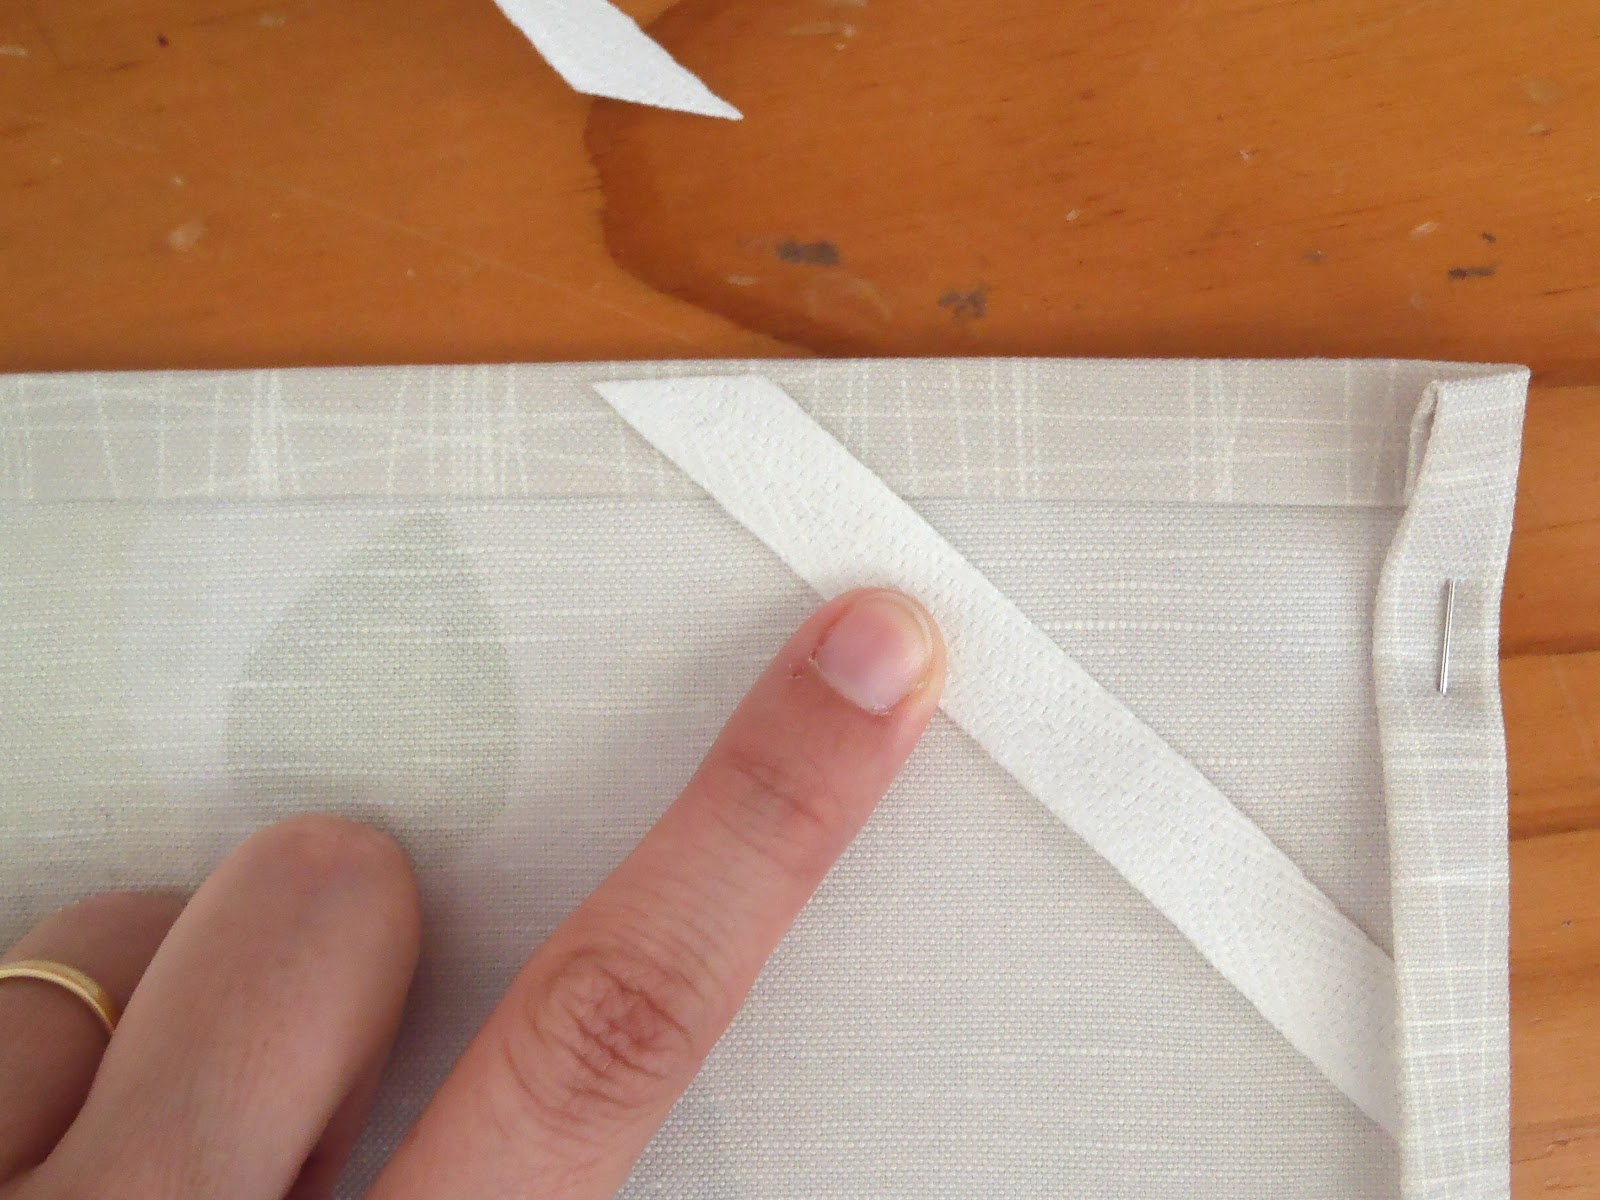
5. Now fold over the short edges in the same way you did the long edges. To get rid of some bulk in the corners, you can clip them like this. (The pic below shows a clipped corner when I started folding the long edge but it's the same idea for the short edges.)

6. If you want, cut out a short section of twill and place this diagonally in one of the corners on the back. This can be used to hang it up if you like.
7. Now sew it up! Sew from the top side as the nicest stitching is always on the top. Start in the middle at the bottom or somewhere else that isn't too noticeable. Now, when I got to the corners, I sewed to the edge, then put the machine in reverse and sewed back about 1cm. I stopped at this point with the needle in the fabric and pivoted the fabric ready to start sewing down the next side. Before sewing down the next side, I put the machine in reverse again and sewed back to the edge, then continued sewing forward down the new edge as normal. This secured the corners well and saved having to completely stop and start stitching at each corner. Hopefully the photos below will make this explanation clearer.
Below you can see how I stitched along to the edge, backtracked to the point where the 2 lines of stitching intersect, then stitched back to the other edge and continued stitching forward down the new side. If this isn't clear to anyone, please let me know and I will post a diagram.
If you happen to miss some of the folded over edge like I did below, just stitch along that area making sure it is caught in this time. If you are lucky, it will barely even be noticeable like mine.
And that's it!
In a nutshell...
1. Cut out.
2. Fold long edges over twice, press and pin.
3. Fold short edges over twice, press and pin.
4. Add a hanger if you want on the back.
5. Sew!
Now you have some lovely, personal, and handmade gifts! If you would like to make it even more unique, you could try designing and printing your own fabric. Here is a great tutorial on how to give that a go with old, handwritten recipes. Have fun!
I discovered Spoonflower about a year and a half ago and had visions of all the wonderful things I would make and fabrics I would design but alas, things have not gone to plan with another little person in the family and I am only now just starting to look at designing some fabric. Even still, who knows when I will actually get it done!
In the meantime, there are countless beautiful designs already uploaded to Spoonflower that you can purchase and when they had a 2013 tea towel competition late last year, and then had a buy 1 fat 1/4 get 1 free sale, I made the most of the situation and ordered some tea towels to make up for Christmas presents. Below is the design I ordered. You can find it on Spoonflower here. This project would actually be great for any time of the year, not just Christmas!

These are pretty easy to make up and great for a beginner as it is all straight sewing! Here's my finished tea towels.

I thought I would add a few instructions on how to sew them up just in case anyone isn't quite sure what to do. It is really simple but wasn't quite as quick as I hoped. I like to have all raw edges hidden and I hate hemming stuff with a passion and that is all you do in this project. haha! Anyway, I was still really happy with how they turned out and the fabric is lovely. Make sure you get the tea towels printed on linen-cotten canvas. It is perfect for tea towels.
How to Finish Your Tea Towel
1. Order your chosen design from Spoonflower and make sure you have it printed on linen-cotten canvas in a fat quarter size. Just type tea towel in the search bar and you will find designs specifically made for tea towels!
2. Cut out your tea towel. Make sure you leave at least 2cm around the design for the hems. Depending on how the designer has designed the tea towel image, you may have a given rectangle to cut out or you may have to get out your ruler and measure it yourself.
3. Secure edges to prevent fraying if you wish. You can zigzag along the edge, overlock, or use pinking shears to do this. I didn't bother since it was covered up and fully enclosed...and I was in a hurry!
4. Fold over the long edges 1cm (or whatever size you want) and press. Then fold them over again 1cm, press, and pin to keep them in place. I used this awesome template from the Scientific Seamstress and it made the job sooooo much easier!

5. Now fold over the short edges in the same way you did the long edges. To get rid of some bulk in the corners, you can clip them like this. (The pic below shows a clipped corner when I started folding the long edge but it's the same idea for the short edges.)

6. If you want, cut out a short section of twill and place this diagonally in one of the corners on the back. This can be used to hang it up if you like.
 |
| Sit twill under edges. |
 |
| Trim even with edges. |
 |
| Add a message if you wish. |
7. Now sew it up! Sew from the top side as the nicest stitching is always on the top. Start in the middle at the bottom or somewhere else that isn't too noticeable. Now, when I got to the corners, I sewed to the edge, then put the machine in reverse and sewed back about 1cm. I stopped at this point with the needle in the fabric and pivoted the fabric ready to start sewing down the next side. Before sewing down the next side, I put the machine in reverse again and sewed back to the edge, then continued sewing forward down the new edge as normal. This secured the corners well and saved having to completely stop and start stitching at each corner. Hopefully the photos below will make this explanation clearer.
 |
| The tag sewn in. |
Below you can see how I stitched along to the edge, backtracked to the point where the 2 lines of stitching intersect, then stitched back to the other edge and continued stitching forward down the new side. If this isn't clear to anyone, please let me know and I will post a diagram.
 |
| The corners securely stitched. |
If you happen to miss some of the folded over edge like I did below, just stitch along that area making sure it is caught in this time. If you are lucky, it will barely even be noticeable like mine.
 |
| The edge I missed catching on the back. |
 |
| The fixed up edge from the front! You can hardly even notice the extra line of stitching! |
And that's it!
In a nutshell...
1. Cut out.
2. Fold long edges over twice, press and pin.
3. Fold short edges over twice, press and pin.
4. Add a hanger if you want on the back.
5. Sew!
Now you have some lovely, personal, and handmade gifts! If you would like to make it even more unique, you could try designing and printing your own fabric. Here is a great tutorial on how to give that a go with old, handwritten recipes. Have fun!
Giveaway Winner!
Thank you to everyone who entered my first giveaway! It was great to hear the suggestions for shop items and very interesting to see that they were so similar! I will be on holidays after Easter but will add some new items when I get back and these will include some hair ties in more neutral colours. I have limited colours at the moment but do have some that are definitely more neutral than the colours I already have listed.
I have also been thinking of adding a 'choose your own colours' listing. Would anyone be interested in this?
And now on to the winner!

Congratulations to Domestic Diva! You are my first giveaway winner! The winner has been contacted and has 24hrs to reply.
Thank you to everyone and I look forward to showing you what I find while I'm on holidays! I have lots of fabric and craft shopping planned! :-)
Happy Easter!!
I have also been thinking of adding a 'choose your own colours' listing. Would anyone be interested in this?
And now on to the winner!
Congratulations to Domestic Diva! You are my first giveaway winner! The winner has been contacted and has 24hrs to reply.
Thank you to everyone and I look forward to showing you what I find while I'm on holidays! I have lots of fabric and craft shopping planned! :-)
Happy Easter!!
Wednesday, March 27, 2013
Last Chance to Enter the Giveaway!
Well it's almost at an end! There are only just under 12 hours left until the giveaway is finished! You could win the lovely little bundle below!

Have you entered yet? I would love to hear more suggestions of what you would like to see in my etsy store!
The winner will be announced tomorrow morning! Stay tuned. :-)

Have you entered yet? I would love to hear more suggestions of what you would like to see in my etsy store!
The winner will be announced tomorrow morning! Stay tuned. :-)
Monday, March 25, 2013
Giveaway Reminder!
Friday, March 22, 2013
Are You a Pattern Follower?
In my experience, there are often 2 types of sewers. Those who follow patterns (and the accompanying instructions) and those who don't. Each often freak out at sewing using the method they are not used to. Or are at least much less comfortable. Hand up anyone? Mine is up right now!
I am a pattern follower. I always have been since way back when I started sewing at about age 11. My mum always followed patterns and produced beautiful garments that looked as good as store bought items. She taught me how to sew, so naturally, I learnt to follow patterns. In home-ec at high school, I was taught to follow patterns. To me, it was just the way you should sew.
Fast forward 10 or 15 years to my discovery of sewing tutorials and patterns on the internet. I discovered what I'm sure are literally hundreds of thousands of tutorials, free patterns, instructions, etc. on countless, various sewing projects. My eyes were opened to people who simply made up their own patterns by tracing around a garment they already owned, and then sewed it up without any instructions whatsoever. It still boggles my mind now as to how they just go for it and manage to produce a fantastic looking garment that actually fits and looks good!
Over the last year or two, I have been inspired to try creating my own patterns and it has certainly been a challenge for me. I have had to do a lot of research on sewing techniques and quickly expand my knowledge and skill base in order to create what I want. I have mostly been successful so far but it sure feels like a lot of hard work. It takes me ages to figure out everything in my head and how best to do it, let alone getting the right shape pattern.
I am currently trying to cement the basic construction of garments in my mind in order to help me with pattern creation and just speed up sewing in general. Because I have always followed patterns, and I find it so much quicker and easier to do so, I have never really remembered the order of how to sew up something more complex than a simple pair of shorts. I really have to think hard about what I should do first and the logical order of steps.
I'm working on shorts for my boys with pockets set into the side seams. Boy am I learning a lot! My seam ripper is getting a lot of use right now! haha This morning, I sewed the pocket flaps onto the sides and then sewed the side seams and inside pocket edge, only to discover that I had sewn the two front pieces together and the two back pieces together at the side seams! (I was meant to sew one front piece to one back piece) After ripping the seams out, I went to match up the front and back pieces so I could sew the side seams properly and discovered that I didn't have the pocket flaps sewn on at the same level! And that is when this morning's project was put aside. lol I'll pick it up as soon as I have another break while Sam is sleeping.
Even though it has been frustrating and is not coming together quickly, I am definitely learning and remembering how to construct shorts with side pockets! I have no idea why this is so difficult when I can do this by following a pattern just fine! I guess it's just not the way I am wired.
So, are you a pattern follower? Or do you just go for it and sew? I would love to hear your stories about your sewing adventures! :-)
Oh! And don't forget to check out the giveaway I have running at the moment! Happy sewing!!
Wednesday, March 20, 2013
My First Giveaway!
***Please note that this giveaway has finished. A HUGE thank you to all my lovely entrants and new followers!!***
It's giveaway time!!
I am totally amazed that my blog has hit 20,000 page views! Thank you to all my lovely readers.
I never imagined I would have so many people coming to my blog, especially in the short time it has been running.
As promised, it's time to reveal the giveaway!

Now for the rules. The giveaway is open to anyone worldwide! To enter, you need to be a follower of my blog. Once you are following my blog, please comment below telling me you are following me. You MUST comment for it to count. For a second entry, please comment below with a suggestion of something you would like to see in my etsy store. You can take a look through my blog to see examples of some things I have made (this is only a very small sample!!). Or you could suggest something different! Please note though, it doesn't guarantee that your suggestions will end up in my store. I will definitely see what I can do though! Craft supplies are hard to get my hands on here in Mt Isa, especially at a reasonable price. Totally not a good situation for a crafty person!! haha
The contest will run for 1 week and end on Wednesday 27th March at midnight AEST (Australian Eastern Standard Time). The winner will be chosen using a random number generator from random.org. Please make sure your email address is visible through your blogger account when commenting so I can contact you. I will announce the winner in a post on 28th March and email you. You will have 24hrs to contact me. If I don't receive any contact within this time, I will draw another winner.
Good luck to everyone and I can't wait to hear your suggestions!
Wednesday, March 13, 2013
Upcoming Giveaway!
I am so excited to see that more and more people are finding my blog useful, especially the fabric ball pattern!! Thank you to everyone who has visited!
The blog is almost up to 20,000 page views! Amazing!
So I thought I would run a giveaway to say thank you to all of my visitors and followers. As soon as the page views tick over to 20,000, the giveaway will begin so stay tuned!
It looks set to happen sometime in the next few days so keep checking back! I am busily working on a little bundle of goodies which will be revealed when the giveaway starts.

Friday, March 1, 2013
A Sneak Peek and My Improving Photography Skills
I just wanted to share some gorgeous new hair accessories I've been making over the past week. The hair accessories below are made with resin cabochons set onto bobby pins. I can't decide whether I like the filigree bobby pins or the plain ones best!

There is also a cute little pair of earrings that has snuck in there. :-) Cute little sunflower cabochons mounted on sterling silver plated studs.

I have had so much fun making them although I think my favourite part was photographing them all and learning how to get some great (or at least better) shots out of my little point and shoot camera.
I've been having trouble getting the lighting right and I'm still not 100% sure it's ok half the time but I think it is an improvement at least.
I watched this wonderful tutorial I found through the Etsy seller handbook. It gave some wonderful tips on how to get the most out of a point and shoot camera, which is what I have. I would LOVE a digital SLR but that is something I will have to save for.
Things have been slow going cause we have all been sick over the past week and a half but I have a bunch of new things to pop in the store that are super cute! Hopefully they will be up soon health permitting!

There is also a cute little pair of earrings that has snuck in there. :-) Cute little sunflower cabochons mounted on sterling silver plated studs.

I have had so much fun making them although I think my favourite part was photographing them all and learning how to get some great (or at least better) shots out of my little point and shoot camera.
 |
| I finally figured out how to get more depth of field with my little point and shoot! Yay! |
I've been having trouble getting the lighting right and I'm still not 100% sure it's ok half the time but I think it is an improvement at least.
I watched this wonderful tutorial I found through the Etsy seller handbook. It gave some wonderful tips on how to get the most out of a point and shoot camera, which is what I have. I would LOVE a digital SLR but that is something I will have to save for.
Things have been slow going cause we have all been sick over the past week and a half but I have a bunch of new things to pop in the store that are super cute! Hopefully they will be up soon health permitting!
Friday, February 15, 2013
Stitches and Love Store is Open!
Eeeek!! The store is finally open! I would love you to come and take a look.

I've started things off with some cute little sets of hair elastics.

 |
| Pretty Chevrons |
 |
| Dusty Pinks |
 |
| All packaged up and ready to go! |
These elastics are made from fold over elastic (FOE) and glitter elastic. The FOE is super soft and much gentler on hair than standard hair elastics. I have used them for a few months now and love them! The glitter elastic is quite gentle too, just not quite as gentle as the FOE. I absolutely LOVE the glitter elastic. :-)
Please share my shop with anyone who may be interested. I will be adding lots more items as I make them and have lots of plans for more gorgeous hair accessories, toys, baby items, clothing and things for around the home.
For all of you who love my fabric ball tutorial and pattern, I will be making some of these too!
Thursday, February 14, 2013
A New Year with New Adventures
This year is full of new things for our family. A new house, new hometown, new job, new kindy, new friends, new church, new goals, and lots of other new things.
Something new for me is that I have finally decided to go ahead and start creating some things to sell! That right! I am opening up an Etsy store!! I have thought about this and wanted to try it for such a long time and have finally decided to do something about it. I also need something bringing in money so I can buy more fabric and craft supplies. ;-)
I am also learning how to source craft supplies and fabric in the country. It is proving quite tricky! We moved to Mt Isa in Queensland's north west and sewing supplies up here are scarce! I am getting very good at scouring the internet and the best source of fabric I have found here so far are op shops! I bought this gorgeous vintage flat sheet last week.


Anyway, as you might have noticed, I love to try lots of different crafts and sewing projects so to start off with, I will be selling quite a variety of items while I discover my style. I am also fitting in my crafting around my 2 little boys and helping out my husband by creating teaching resources so I will only be listing items as I can make them. This might mean that some weeks it will only be 1-2 new items...other weeks it might be 10! Hopefully there won't beany many weeks with none.
I don't have the store open yet as I am doing some final touches but will let you know as soon as it opens! Keep checking back for updates!!
Something new for me is that I have finally decided to go ahead and start creating some things to sell! That right! I am opening up an Etsy store!! I have thought about this and wanted to try it for such a long time and have finally decided to do something about it. I also need something bringing in money so I can buy more fabric and craft supplies. ;-)
I am also learning how to source craft supplies and fabric in the country. It is proving quite tricky! We moved to Mt Isa in Queensland's north west and sewing supplies up here are scarce! I am getting very good at scouring the internet and the best source of fabric I have found here so far are op shops! I bought this gorgeous vintage flat sheet last week.

Isn't it sweet?? I have lots of ideas running around in my head for this!
I also got this beautiful fabric!

I'm not sure what I'm going to use this one for but I absolutely love asian prints and fabrics and couldn't pass it up! I am hoping to create lots of asian inspired items for my shop.
Anyway, as you might have noticed, I love to try lots of different crafts and sewing projects so to start off with, I will be selling quite a variety of items while I discover my style. I am also fitting in my crafting around my 2 little boys and helping out my husband by creating teaching resources so I will only be listing items as I can make them. This might mean that some weeks it will only be 1-2 new items...other weeks it might be 10! Hopefully there won't be
I don't have the store open yet as I am doing some final touches but will let you know as soon as it opens! Keep checking back for updates!!
Subscribe to:
Posts (Atom)