Showing posts with label tutorial. Show all posts

Friday, March 24, 2017

Pillowcase Dresses

My current dress progress. Isn't it pretty?


As usual these days, it's been a long time between posts. Since I last posted, I have moved 2000km back to where I grew up, sent my youngest off to school and gone back to uni. I have contemplated deleting this blog many times but then I get a lovely comment from a reader about how much they appreciate one of my tutorials and I just can't delete the blog when people are still enjoying it and finding it useful. Thank you to everyone who still finds my blog and takes the time to leave a comment!!

Recently I have tried sewing pillowcase dresses. They are so quick and easy to make and so pretty too! I got some great inspiration on Pinterest and then just picked and chose the bits I liked best. I couldn't possibly just follow a tutorial as is could I? Ha!


I just need to add binding to the arm holes, make the top casing and thread the ribbon!


There are heaps of tutorials online for these and I thought I would share some that I have found really useful so you can give it a try too!

Dress a Girl Around the World - This is a great tutorial that uses elastic across the top front and back and bias binding for the ties. They also distribute dresses for kids in struggling countries so you might like to check that out too!

Coral & Co. - Shelly has been very kind and provided a FREE downloadable pattern along with her tutorial. The pattern gives the dress an A-line shape instead of the traditional pillowcase rectangle and the straps are made the traditional way with a ribbon or tie threaded through the top front and back casing. Oh, this one also includes a ruffle at the bottom and can be made as a top or dress.

Sew Sweet Patterns - SSP also provides a free downloadable pattern with their tutorial. Here you can see how they use an actual pillowcase to make the dress. The pattern also gives a slight A-line shape and has the traditional ribbon ties through casing.

Sew Delightful - This is another group of people who sew dresses for kids in need. They provide a fantastic cutting guide for a large range of sizes. No pattern is needed as they use the traditional rectangle shape.

Candice Ayala - This is not a pattern or tutorial but a gorgeous idea that I loved. This clever sewer has modified the back of her dress so that the bow can be tied at the back and it looks beautiful! Check it out!

We All Sew Bernina - Bernina has a great tutorial as well! This website includes the cutting guide (instead of pattern) and a tutorial for a traditional pillowcase dress.

That should be enough to get you going. And don't forget to check out my Pinterest board full of gorgeous pillowcase dress inspiration!

I can't wait to see it finished!

Friday, March 29, 2013

Fabric Easter Eggs Tutorial from Retro Mama

This gorgeous little Easter egg tutorial has been around for awhile now but I seem to forget about it every year until it is too late! I thought I would share it in the hope that I will remember about it for next year and hopefully you will remember too! You can find it here on Retro Mama's blog.


If you haven't discovered Retro Mama, go and check her out right now! She has some beautiful sewing patterns and uses such gorgeous fabrics. I love browsing through her blog and etsy store.

This tutorial is pretty quick and easy to whip up and is fantastic for using up your fabric scraps. I won't get to make any this year because I am currently sick and still have to make my boy's Easter chocolates (they are dairy and additive free) but these are so easy you might still have time!

Happy Easter to all of my lovely readers!

Thursday, March 28, 2013

Handmade Tea Towels Tutorial

One of my favourite websites is Spoonflower...a site that allows you to upload your own designs and get them printed on fabric, wallpaper, wall decals and over Christmas, they also had wrapping paper available too!


I discovered Spoonflower about a year and a half ago and had visions of all the wonderful things I would make and fabrics I would design but alas, things have not gone to plan with another little person in the family and I am only now just starting to look at designing some fabric. Even still, who knows when I will actually get it done!

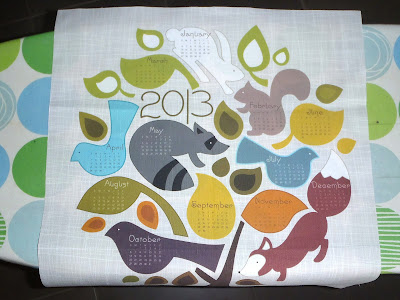
In the meantime, there are countless beautiful designs already uploaded to Spoonflower that you can purchase and when they had a 2013 tea towel competition late last year, and then had a buy 1 fat 1/4 get 1 free sale, I made the most of the situation and ordered some tea towels to make up for Christmas presents. Below is the design I ordered. You can find it on Spoonflower here. This project would actually be great for any time of the year, not just Christmas!


These are pretty easy to make up and great for a beginner as it is all straight sewing! Here's my finished tea towels.


I thought I would add a few instructions on how to sew them up just in case anyone isn't quite sure what to do. It is really simple but wasn't quite as quick as I hoped. I like to have all raw edges hidden and I hate hemming stuff with a passion and that is all you do in this project. haha! Anyway, I was still really happy with how they turned out and the fabric is lovely. Make sure you get the tea towels printed on linen-cotten canvas. It is perfect for tea towels.

How to Finish Your Tea Towel

1. Order your chosen design from Spoonflower and make sure you have it printed on linen-cotten canvas in a fat quarter size. Just type tea towel in the search bar and you will find designs specifically made for tea towels!

2. Cut out your tea towel. Make sure you leave at least 2cm around the design for the hems. Depending on how the designer has designed the tea towel image, you may have a given rectangle to cut out or you may have to get out your ruler and measure it yourself.

3. Secure edges to prevent fraying if you wish. You can zigzag along the edge, overlock, or use pinking shears to do this. I didn't bother since it was covered up and fully enclosed...and I was in a hurry!

4. Fold over the long edges 1cm (or whatever size you want) and press. Then fold them over again 1cm, press, and pin to keep them in place. I used this awesome template from the Scientific Seamstress and it made the job sooooo much easier!


5. Now fold over the short edges in the same way you did the long edges. To get rid of some bulk in the corners, you can clip them like this. (The pic below shows a clipped corner when I started folding the long edge but it's the same idea for the short edges.)


6. If you want, cut out a short section of twill and place this diagonally in one of the corners on the back. This can be used to hang it up if you like.

Sit twill under edges. 

Trim even with edges.

Add a message if you wish.

7. Now sew it up! Sew from the top side as the nicest stitching is always on the top. Start in the middle at the bottom or somewhere else that isn't too noticeable. Now, when I got to the corners, I sewed to the edge, then put the machine in reverse and sewed back about 1cm. I stopped at this point with the needle in the fabric and pivoted the fabric ready to start sewing down the next side. Before sewing down the next side, I put the machine in reverse again and sewed back to the edge, then continued sewing forward down the new edge as normal. This secured the corners well and saved having to completely stop and start stitching at each corner. Hopefully the photos below will make this explanation clearer.

The tag sewn in.

Below you can see how I stitched along to the edge, backtracked to the point where the 2 lines of stitching intersect, then stitched back to the other edge and continued stitching forward down the new side. If this isn't clear to anyone, please let me know and I will post a diagram.

The corners securely stitched. 

If you happen to miss some of the folded over edge like I did below, just stitch along that area making sure it is caught in this time. If you are lucky, it will barely even be noticeable like mine.

The edge I missed catching on the back.

The fixed up edge from the front! You can hardly even notice the extra line of stitching!

And that's it!

In a nutshell...

1. Cut out.
2. Fold long edges over twice, press and pin.
3. Fold short edges over twice, press and pin.
4. Add a hanger if you want on the back.
5. Sew!

Now you have some lovely, personal, and handmade gifts! If you would like to make it even more unique, you could try designing and printing your own fabric. Here is a great tutorial on how to give that a go with old, handwritten recipes. Have fun!

Friday, November 23, 2012

Christmas Decoration Hanger

Maybe you've seen these before but seeing as this is my first kindy experience as a mum, this is new to me and I thought it was a great idea. We were asked to make a tinsel covered hanger that would be used to hang any decorations that Max makes leading up to Christmas. It's super easy to make and quite effective.


Supplies
- 2 wire coat hangers
- Sticky tape/string
- 3-4m tinsel (this varies depending on how tight you twist it)

1. Place your 2 coat hangers in a cross shape as though they were hanging at right angles to each other. Tape or tie them in place at the top and at the bottom when the wires crosses.
2. Bend the hook of one of the hangers so that both hooks face the same way.
3. Tape one end of the tinsel just below the curve of the hanger at the top and start twisting it around the wire. Cover one coat hanger and then the other.


4. If you run out and need to start a new piece of tinsel, just tape the ends and twist the tinsel over them to cover up the taped part. Tape the end once you are done.

That's it! Super easy.

Here is Max with his. He was very proud of it. I can't wait till he brings it home with all his decorations.


Tuesday, November 6, 2012

Emma's Bears Free Teddy Bear Pattern and Tutorial

One of my good friends, Emma, is the most amazing teddy bear creator. She has been making bears since we were in high school and now she sells them as well as bear making supplies. I received a few bears as Christmas presents way back then.


Emma has just shared a fantastic free bear pattern and tutorial on her blog and I wanted to share it with you. This is the gorgeous bear you can create from her pattern.


Emma's bear supply store is called Fur Addiction and features beautiful furs and other bits and pieces. She dyes her own fur and even paints her own eyes. They are just gorgeous! It's certainly worth a look! She also sells her creations and supplies on Etsy. Almost all of Emma's creations are one of a kind. There are bears and other stuffed animals, patterns, kits and more. If you want to get into bear making, this is a wonderful place to learn.

Thursday, March 15, 2012

Finally My Free Fabric Ball Pattern is Here!

I'm very excited to finally be able to share my fabric ball pattern with you!! It only took me 8 months (eek!!) to get around to putting it into a pdf and posting it online! My wonderful husband helped me to create a pattern piece based off a perfect sphere which has produced lovely, round, fabric balls. Last night, he taught me how to use Illustrator so I have a lovely little pdf pattern to share with you all. I hope you like it!

You can find the free fabric ball pattern posted back in the original tutorial here.


PS: There are also a couple of new tips in the tutorial that I have learnt after sewing a number of these. Have fun!! xx

Saturday, February 25, 2012

Sewing With A Twin Needle

Today I finally tried out my twin needle that I got last September...sad I know! I have NO idea why I waited this long because it is amazingly easy!! I always thought it would be fiddly or difficult but it isn't!!! It's crazy how fear stops you trying something and then once you try it, you wonder why you didn't try it sooner.

I needed to take up the hem of some track pants I bought for Max and thought it would be the perfect opportunity to try out the needle. You can see the lovely row of neat, double stitching along the bottom. I would love to get a few twin needles in different widths as I would have used a wider needle if I had one but am still very happy with how these turned out.


I thought I would include a bit of a how-to on using twin needles and some info on stuff I figured out along the way. I spent a lot of time pinning and reading these tutorials and posts over the last few months to help me figure out what to do so I definitely want to give them credit! You will probably even find extra info and tips too! I'm sure I read more than these 3 but these are the only ones I can find right now.


Here's What I Did - How To Sew With A Twin Needle

In a nutshell...
  • Buy a twin needle.
  • Put it in your machine.
  • Pop 2 spools of thread and your bobbin in.
  • Thread the needle.
  • Sew!
For those who need more details... :-)

1. Buy a twin needle from your local sewing shop. I bought a Klasse Twin Stretch needle, 4mm and size 75 from my local Spotlight store. These needles come in various widths ranging from 1.6mm to 6mm, various sizes, and for various fabrics or threads. You can view the range here. I am sure there are other brands out there but this will give you an idea of what types are available.


2. Put the needle into your machine. They can be used in pretty much any normal sewing machine and you put it in just like a regular, single needle.


3. Put a spool and bobbin or 2 spools of the same colour on the spool holders/pins on your machine. Some machines have 2 permanent spool pins, 1 permanent and one temporary, or only 1 standard spool pin. My machine has 1 permanent pin and 1 temporary pin as you can see below. If you have 2 permanent spool pins, then just pop 1 spool/bobbin onto each pin and if you only have 1 spool pin, go here to see how to put them both on the same pin.


4. Take both threads and thread your machine just as you normally would with 1 thread. It really is that simple with the threading. Don't stress about the threads getting twisted or tangled...it just works! When you get to the needle, separate the threads and thread one through each needle. 


5. Make sure you have a bobbin in the bobbin holder. It doesn't really matter what colour this thread is because it stays on the back side of the fabric quite easily due to the zigzag that it does along the back.


6. Sew!! It is worth doing a few practice runs to make sure the tension is right but once you get that, you just sew like normal! If the fabric seems to pull into a ridge between the 2 rows of stitches, loosening the top thread can help with this. Also ironing can help it to sit flatter. You can back stitch to secure starts and ends and just sew like normal! It really is that easy!! You just have to keep in mind that you can only ever sew with the right side of the fabric up because the underside doesn't look the same as the top.


So that's it! Using a double needle is super easy and can make a big difference when hemming knits or just to add more interest and detail to woven fabrics. I hope that you won't feel so scared to try this now!

Tuesday, December 13, 2011

Christmas Stockings for Our Family

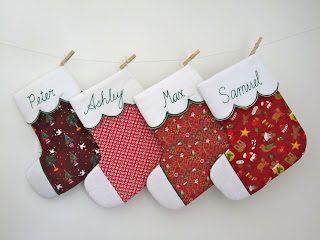
My mum started a tradition of making us all our own Christmas stocking for our first Christmas. As kids, we always thought our stocking were the most awesome Christmas stockings around and we still all love them! When I got married, I decided to continue the tradition and made my husband a stocking for our first married Christmas. I did the same for Max's first Christmas and today, I've just finished Sam's Christmas stocking just in time for his first Christmas. I'm so relieved I got it done in time. Life is a whole lot busier with 2 little boys to look after. :-)


They are lined with batting in between the fabric and lining and the names are embroidered in chain stitch. The edges of the cuffs are done in satin stitch and clipped close to the stitching. I never really intended it but they've all ended up in a shade of red!! I think they look really nice all together and our little stocking family is complete. :-)

Christmas stocking are something that you can make for anyone including those special boys in your life. I used an old McCall's pattern for these stockings so I can't post a pattern online but here's a few links to some great stocking tutorials if you'd like to make some yourself.

Tip Junkie's list of stocking tutorials
Fabric Worm's stocking tutorial
Prudent Baby's stocking tutorial
Sew Like My Mum's stocking tutorial

That should be enough to get you going and give you some great ideas. Happy stocking sewing!!

***UPDATE: Here is a pic of the pattern I used just in case anyone is interested in tracking it down. You can often find it available online second hand. :-)***

Saturday, October 8, 2011

Free Monster Doll Tutorial & Pattern from Jo-Ann Fabric & Craft Stores!

Here's another wonderful tutorial with pattern completely free! Seems I can go for weeks searching for something really good and then all of a sudden, tutorials pop out of the woodwork! Can't believe I've found 2 in 2 days! :-)


This is in a PDF format and has pattern pieces for the monster and 3 costumes for him. Although I don't celebrate Halloween, it would be perfect for anyone who does and I'm sure little boys would just love this at any time of the year. Unfortunately, I haven't made this yet and again it will be added to my list of projects but it certainly looks well written and worth a try.

Click on the link below to get your free PDF and enjoy!!

Free Halloween Project from Jo-Ann Fabric & Craft Stores!

Friday, October 7, 2011

Free Car Pillow Tutorial from Noodlehead


I just had to share this gorgeous tutorial with you! I haven't tried it myself but it is well written and has plenty of photos...and is simply perfect for boys! Gorgeous tutorials like this NEED to be shared. :-)

It's from a fantastic blog called Noodlehead. Just click on the link below to view the tutorial.

Noodlehead: car pillow tutorial

Now get sewing and enjoy! I can't wait till my current list of projects are finished so I can get to this one. :-)

Tuesday, August 30, 2011

Quick Version of the Free Bunting Tutorial & Pattern

I tend to write quite detailed tutorials based on exactly what I did which is handy and can save confusion and questions but can take awhile to read and work through. I thought I'd post a super quick and easy version of the bunting tutorial for those who don't need all the details because it really is an easy thing to make.


Requirements

- Fabric of your choice (how much depends on how many flags you want to make...it's a great project for using up your scraps!)
- Bias Binding or Ribbon (length depends on how long you want your bunting to be)
- Cotton thread

1. Print the template. Choose the size flag you want and cut it out.


2. Cut out 2 triangles per flag for as many flags as you want.

3. Pair up your triangles and pin each pair with right sides together.


4. Sew down the 2 long sides of each triangle with a 1cm seam allowance.


5. Clip all corners of the triangle making sure you not only clip across the main point of the triangle but up the sides a little too.


6. Turn all triangles out the right way and press.


7. Fold and iron your bias binding or ribbon in half lengthways.


8. Measure 30cm-50cm from one end of your binding and slide the top (unfinished edge) of your first flag in between the fold and pin it in place. Do the same for the next flag leaving a gap between flags that is whatever length you desire. Repeat this with the same gap between all flags until you have them all pinned into the binding.


9. Trim the end of your binding so that it is the same length as the piece you left at the start.

10. Fold each end of the binding in slightly to create a neat finish and pin in place.


11. Sew along the open edge of the length of the binding making sure you catch in both sides of the binding and sewing in all flags. And you're finished!! :-)


Recommendations

- Use fabric that is not see-through. I got caught out with this even using quilting fabric. Thicker fabric won't show through the other side and will hide the seam allowances better giving it a much nicer look.

- Use bias binding or ribbon that is not see-through. Again like the fabric, I found the bias binding I used showed the fabric underneath and it will look a lot nicer if you can't see patterns from the flag fabric showing through.

Tuesday, August 23, 2011

Free Bunting Tutorial & Pattern

The first time I ever saw fabric bunting, I fell in love with it. Granted, it was in beautiful florals and girly colours so just a bit different to what I will be making for my boys. I am part of a due date group for this bubby and seeing everyone else's photos of how they are decorating their nurseries has really motivated me to put more effort into decorating the boy's rooms. I am making bunting for bubba first so that his room is ready when he is born. Max will have to wait a little longer. :-) Anyway, here's my tutorial and pattern. It's quite simple and can have many modifications to suit all kind of themes.


If you are more experienced in sewing and don't need the fine details, I will be posting a super fast cut down version of this tutorial soon. :-)


Bunting Tutorial


Requirements
- Fabric of choice
- Bias binding, ribbon or something similar
- Sewing thread


1. Print out the template. Choose your desired flag size and cut it out. I used the medium size and all measurements referring to the flags is based on this. The template includes a 1cm seam allowance along the 2 long edges and the top edge will be enclosed in the tie.


2. Before cutting out your flags and tie, you need to figure out how many flags you will need and how long your bunting will be. You can either just make it a certain size (say, 10 flags long) or you can measure your space and make it specifically to fit. If you want to just make it a certain number of flags long, you need to add up the length of the tie or left over at each end, the width of each flag, and the spaces between. The length of the tie or left over at each end and the spaces between is entirely up to you. I have made my ties 40cm long at each end and the space between each flag is 3.5cm.


Eg. for 10 flags, you would add:
Tie 40cm, flag width of 14.5cm x 10, spaces between flags 3.5cm x 9, and the tie at the other end 40cm.
So that's 40 + 145 + 31.5 + 40 = 256.5cm or 2.565m


If you want to make it specifically to fit a certain space, measure the space you want to hang it in and lower the tape measure until you get a nice drape. If the space is quite long, you may need someone to hold the other end or even 2 helpers to hold the ends so you can stand back and have a look (or you could blue tack each end to the wall). You can also use string if the space is longer than your tape measure and then measure this later.


Now divide your measurement by 18cm. This is the length of 1 flag and 1 space. You will most likely find that it doesn't divide evenly so you will have to decide if you will go up or down to get an even division. Multiply 18cm by that number to figure out the exact length from the start of your first flag to the end of your last flag and just measure this out in your space to make sure you are happy with the drape. If you went up a flag, you will have more drape than you originally measured for. If you went down a flag, you will have less drape.


Eg. My measurement with drape was 81.5cm.   81.5cm ÷ 18cm = 4.52    Obviously I don't want 4 1/2 flags so I went up to 5 flags.     18cm x 5 = 90cm     So the distance from the start of my first flag to the end of my last flag is 90cm. 


Don't forget to add in the length of the ties at each end (40cm each). So the total length of my piece of bunting is 1.5m (90cm + 80cm). Leave an extra 1cm at each end for turning under or neatening the edge.


3. An easy way to cut out your flags (and method that needs the least amount of equipment) is to simply pin the pattern onto your fabric and cut out your flags. Make sure you line up the grain line with the straight grain of you fabric. You will need 2 triangles per flag.


I cut out my flags by using a rotary cutter, quilting ruler and self healing cutting mat. I found this quite quick and think it gives straighter edges and neater triangles. You just lay the pattern on your fabric, line up the ruler with each edge and cut. You can cut more than 1 triangle depending on how thick your fabric is.


4. Lay a pair of triangles on top of each other with wrong sides facing lining up all edges and pin. Sew with a 1cm seam allowance down one long side, pivot at the point, and sew back up the other long side leaving the top of the triangle open. Do this for all your triangles.


5. Clip the points of the triangle as shown in the picture below. This makes your point less bulky and helps it sit flatter.


6. Turn your flags out the right way and use something pointy to carefully turn out the point neatly. I used a small crochet hook. Pencils also work well or chopsticks.


7. Iron (press) all of your flags making sure the seam allowances sit flat and straight. This step makes a big difference to the look of your flags and will help them look neat and like proper triangles.


8. Now you need to sew all the flags into your ribbon or binding. Check the top edges of your flags to make sure they are straight and trim any as necessary. Carefully fold and iron your bias binding or ribbon in half length ways.


Measure 40cm from one end of your binding and slide in your first flag. Slide the flag right into the fold and pin. Measure 3.5cm from the end of this flag and insert the next flag in the same way. Continue to do this until all your flags are inserted and pinned in place. You should have about 40cm of binding left-trim off any extra. Before sewing everything together, turn in each end of the binding to cover up the raw edges and pin this in place. 


Now stitch along the binding close to the open edge and your finished!


All finished and ready to hang. Now I just need to clear out the baby's room so I can hang them. :-)

Related Posts Plugin for WordPress, Blogger...